Sunday, December 20, 2015

Multi Layered Die Cut Christmas Card

I have been wanting to really go crazy with some of my dies but had not found the right reason ... and then came Christmas. I love using deer in my Christmas cards (remember last year silver and gold glittered dies or the sticker deer card), so this year I decided to just use layer upon layer of die cut images to create a Christmas nature scene and here it is.


This is how the card came together. Starting with a square white piece of paper out of which I die cut a circular opening in the center. Next I used a Swiss dot embossing folder on the paper to create the illusion of falling snow. I then layered a deer die-cut from Memory Box and a birch tree die-cut from Impression Obsessions.  I used 1/8" thick raised adhesive squares for the deer, trees and snow bank (cut free handed from another piece of white paper). I added the embossed paper using 1/4" raised adhesive squares to create the snowy background. Next I made a circular frame using two circle dies from Spellbinders. Merry Christmas!


Saturday, December 5, 2015

Mrs. Grossman's Altered Christmas Sticker Cards

As every one knows by now, my favorite stickers are usually from Mrs. Grossman's and I especially love the laser cut ones. Unfortunately the colors they come in doesn't always match my idea ... so I color the stickers and voila ... a new look!

Holy Family:
The sticker comes bright red and quite frankly that didn't suit my idea of an appropriate color for the holy family. So I colored the entire sticker with a black marker and then layered the sticker on white paper, then black and finally mounted the whole panel on a white card. To add just enough sparkle I added a gold star sticker.


The Skaters:
This sticker comes in bright green (the remnants of the original color can be seen in the skaters and the trees) but again, it wasn't right for me. So I colored the edges of the ornament in gold and the sky and ice in silver. I added holy stickers and text to accentuate the green and then framed the whole image with gold lines.


Woodland Christmas;
I went to town altering this sticker! I started by coloring the entire bright red sticker with a gold marker. Then I added the gold sticker to a white piece of paper, down cut it to size and edged the smaller panel with gold lines. Next I took white snow flake stickers and colored them gold as well. I mounted the square panel to a glittering white card using raised adhesive dots. Then I added the gold colored snowflakes to the background. Next I added the red hearts and the gold mirrored dove to the center panel. To finish the card I added the gold text.


All the added stickers are, of course, from Mrs. Grossman's.

Thursday, November 26, 2015

Thanksgiving 2015

Before I could start my Thanksgiving cards someone posted some beautiful photographs from their drive along a fall forest filled with fiery colors and bright sunshine. I decided that I would try to recreate the effect for one of my cards ... and here it is.


To create the idea of the great outdoors I started with a light tan card covered with a panel of wooden patterned paper (My Mind's Eye) which I edged the panel with both brown and black ink before before attaching it to the card. by stamping a waterfall image (Inkadinkado) in black ink on white paper which I colored using a combination of regular water colors and metallic water colors. I die cut the stamped image using a deckled oval theme (Spellbinders) and then edged the panel with more black ink to emphasize the colors and b rightness within. I attache the stamped panel to the card. To completed the fiery fall look I added some gold rub-on vines (Little Bit) and some glittered 3D leaf stickers (Paper House). Thank you Mother Nature for your daily beauty and inspiration.

Sunday, October 25, 2015

Halloween 2015

This year for Halloween I wanted to use a haunted tree image (the scariest part of the original Disney Snow White movie) so here we go again, same theme 3 media! 

Card #1 - Stamped
Bees Wax sun with cloud and Inkadinkado/EK Success tree stamps in black ink on good old Basic Grey paper, edged with black ink and Tim Holtz background on the bottom. I colored the moon using white water color and the eyes using yellow with silver faux gems. 


Card #2 - Rub-ons
American Tradition glittered Halloween tree with moon rub-on blue painted weathered paper (my favorite patterned paper of late) die cut with the Sizzix (now retired) parchment die and then edged with black ink. The text is computer generated.


Card #3 - Embossed
Using a Tim Holtz embossing folder I dry embossed a piece of back paper; which I then highlighted using a white ink pad. Cut out the embossed panel, mounted that on a piece of white paper, more cutting and then mounted on a black card. As a final touch I added a 3D glittered white pumpkin from Jolee's Boutique/EK Success.


These are all easy and quick because who wants to waste time making cards when there's candy to eat!

Saturday, September 26, 2015

Happy 1st Day of Autumn

Here's a simple card I made to celebrate the first day of Autumn. OK so it's a flower card maybe not the most masculine card I could have made (not everyone is perfect) but it has many masculine touches.


I started with the color selections; I wanted to really highlight the colors in the 3D glittered sticker from Recollections/Michael's flowers. I chose an ivory and orange (bold and somewhat masculine). Although it's hard to see in this scan, there are subtle touches of gold glitter on the flowers, so gold became my highlight colors as well. The die cut frame (Spellbinders Fleur de Lys) is edged with gold ink and the orange panel is framed with a thin gold line sticker from Mrs. Grossman. I also added a couple of gold sticker flourishes around the flower to balance the overall center of the card.

I for one am looking forward to the cooler weather and the fiery colors Autumn brings!

Saturday, September 19, 2015

Thanksgiving Inspiration

I try to challenge myself by selecting one single appropriate image for each Holiday and then making the most out of it by reproducing it with stickers, stamps and die cuts. This year my Thanksgiving inspiration was a shaft of wheat. Here are my three versions (as published in the November/December 2015 issue of Scrap & Stamp Arts magazine).

The first card was made using a 3D sticker.


The second card was made using a stamp.


The third card was made using a die.


These are simple cards to  make ... they need to be with the Holidays being busy already without having to spend hours making cards to go along with them!

Sunday, September 13, 2015

Layered Masculine Card

I enjoy using 3D stickers on my cards ... but I also enjoy creating my own 3D images using stamps. Case in point my square deer card.


I started by stamping a deer image with trees from Serendipity Stamps twice in brown ink on Cosmo Cricket Chicken Little patterned paper (to me it's the best sky background). I color both image with pencil and then cut out one of the deer images and one of the trees. The second one is cut into a 4"x4" square panel on which I add the cut out images with thin raised adhesive dots. This panel I add to a 5 1/2" x 5 1/2" square chocolate brown card. Next I cut a square frame using Spellbinders dies to match the exterior size of my stamped panel from a light brown piece of paper; which I them add to the card using raised adhesive dots. 

Saturday, September 5, 2015

Masculine Halloween Card.

The October issue of Scrap & Stamp Arts includes my article and cards for masculine Halloween cards ... but I left one out specifically for use here. 


I started by using a Spellbinder die to create a mask ... I actually used the surround as the mask. Using a light pastel green paper as the background, I next colored the inside of the mask with grey ink. Before removing the mask I stamped the Inkadinkado image in permanent black ink inside the masked off area. After the image was dry, I colored the moon using white water color. Next I used the next larger die in the same set to cut out the stamped panel. Before removing the die, I mused it as a guide to draw a thin frame with a black marker.To finish the card, I added a computer generated text and added the panel to a black card using raised adhesive dots.

Simple, easy and fit for any man to enjoy on Halloween!

Friday, August 21, 2015

More masculine themed cards

So far I've received positive reviews and comments on the masculine themed cards and the articles that have been published in Scrap & Stamp Arts magazine. I thought I would post a couple more cards here for which I decided to use animals for the masculine image.

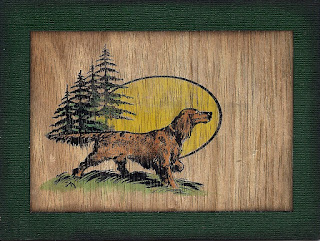
The first card uses man's best friend (Flonz) stamped in permanent black ink (Staz-On) on a wooden paper (EK Success). The stamped image was colored with water colors. Before mounting the wooden panel on the card I edged it with brown and sepia ink (Ranger Archival). 


The second card started with some star embossed paper I found in a clearance rack (no manufacturer) at my local craft store. I darkened the embossing with brown ink to create some depth. The star patterned paper seemed appropriate for a western theme ... so that's where I took the card. On a piece of parchment paper (The Paper Company) I stamped with a horse theme (Inkadinkado) in brown permanent ink (Staz-on). There are two stamps involved, the first is the rearing horse; which I then masked and over-stamped with the group of horse. I colored the horses using pencil. The stamped image was die cut using the radiant rectangle die (Spellbinders). I cut the frame portion apart to create a flourish detail; which I added at the bottom of the card. Before I adhered anything in place I edged everything with brown ink.


I chose not to put a text on either card that way they can be used for almost any occasion.

Saturday, May 9, 2015

Cards for Men by a Man ...

The July 2015 issue of Scrap & Stamps Arts is out and so is the first entry of mine in what I hope will be a continuing section on masculine cards.


My idea is to make simple everyday or occasion cards with a masculine images/themes/ideas that does not rely on women, alcohol or guns (nothing wrong with any of those three items but there is so much more out there). The first entry contained three cards ... no major 3D effects, no bling and no complications, just simple heartfelt thoughts, using monochromatic color schemes, that sometimes are forgotten for men .

A quick thank you for all the things he does (even a man likes to be appreciated),


a gentle yet manly reminder that you Miss Him at times (every one likes to hear that),


or a gentle reminder to let him know that every thing will be OK with a General Feel Good saying!


Sometimes it doesn't take much to make someone feel special. I hope that with each set of cards someone else will get an idea and start creating masculine cards.

Sunday, April 12, 2015

Inkadinkado Stamping Gear Set

I recently found the Rectangle and Square Inkadinkado Stamping Gear set on clearance for $5.97 (original cost $49.99) and at that price I couldn't very well resist. Unfortunately the concept is really too big for most cards and work better for 12" x 12" backgrounds for scrapbookers. After several attempts at using the set; which is basically a stamping version of the old Spirograph, I realized this was not my thing. Instead of trying to force a design I decided to just use the stamps themselves. here's my first card - an elegant masculine card.


I started by stamping the Art Deco Inkadinkado stamp four times in permanent dark brown ink from Staz-on on a beige piece of paper. Each image was cut down to create squares; which I stacked one over the other after edging each square with more brown ink. I mounted the panel on a piece of chocolate brown paper from Die Cut with a View and then on a size A2 white card.  To finish the card I added color using Sharpie markers and some square rhinestone from Mark Richards. 

Saturday, January 31, 2015

Magazine Column

I'm very happy and proud to announce that starting with the July 2015 of "Scrap & Stamp Arts" I will officially become part of their family with a regular column on masculine cards. The idea is that I will write short articles with accompanying new cards  ... all masculine themed! This falls beautifully into place with my new year's resolution to concentrate a little more on masculine themed cards. The cards will not only use stamped images but stickers and even die cuts.  


Sunday, January 11, 2015

Foiling technique - to be perfected!

I truly enjoy metals and especially "foil" as a finish for my cards ... the problem is the technique is not the easiest (at least not for me). Last year a major manufacturer came out with stencils, glue and special foil paper and tried to revitalize the process ... I tried it but the results were not that great. Another manufacturer came out with pre-design double sided adhesive to be used with the foil ... but the cost seemed high. After the Holidays I found the entire line on clearance at my local craft store and decided to give them a try. I decided to make a masculine themed Easter card.


The process is simple ... the double sided adhesive pattern is nestled between two protective sheets. First the backing sheet needs to be carefully pealed away. The adhesive is then laid on the card and gently rubbed in place before the second protective layer is removed. Finally a sheet of foil is laid over the adhesive and rubbed down to transfer the metallic finish. Unfortunately I wanted a shimmering paper for the background and the only one I had on hand happened to be textured ... take it from me this was not the way to go. Anyway, I added a die cut cross (Magenta) and a quick sticker text to complete the card.   The scan does not do the card justice but I have to admit that the textured paper is a problem!

Thursday, January 1, 2015

New Year 2015

2015 will be the year for me to go back to my original reasons for making cards (almost 40 years ago)! I started to make cards because I couldn't find appropriate masculine themed cards and to find a less expensive way to send a card. Over the years I've wondered away from both. I have also amassed a huge amount of supplies so  much so that I've also made the resolution not to buy any new supplies in 2015. To show everyone how sincere I am at my goal ... here are five cards to illustrate the theme. 

I used one stamp in five different ways; which include creating my own 3D effect,


These are simple to make and each one uses very few supplies ... basically besides the single  stamp all I used was black or brown ink, a bunch of solid colored papers and water colors. I will continue making these cards through out the year ... starting with Valentine's Day.