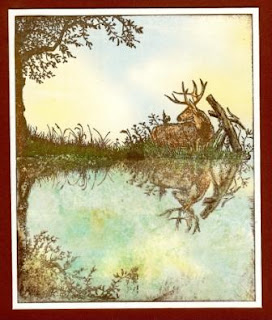
A number of people have asked me about the articles I wrote over the years ... especially those about stamping techniques. I decided to repeat some here on my blog. The technique/article I want to start with is the one on "mirror' stamping.
Like the name implies, the idea is to create
the illusion that the image is “mirrored” or “reflected”. The important part to the
technique is to remember that when objects are “mirrored” or “reflected” they
appear reversed, upside down and lighter. Although it sounds complicated it’s very do-able with the right tools
and all you need is a sheet of rubber available at most home
improvement store’s plumbing department. Actually you
can also purchase a rubber stamp with no image that is used for this purpose; however,
I found the size and the cost prohibitive. I would also
recommend using a stamp positioning tool (I use a Stamp-a-ma-jig) unless you
feel confident enough with your visual alignment skills. To demonstrate the technique I chose two simple
cards: one with a single mirrored image and a second with two mirrored images. There are, of course, many more ways to use
this technique.
Lighthouse Card (single mirrored image)
Step 1:
Lay the rubber pad down flat on your work surface and stamp the lighthouse
(Inkadinkado) in grey ink aligning the bottom of the stamp with the bottom of
the rubber pad. I used grey to keep the
mirrored lighthouse lighter than the direct stamped lighthouse.
Step 2:
Lay the background paper over the stamped lighthouse face down (making sure
that there is enough room for the rest of the stamping) and rub the back of the
paper to transfer the inked lighthouse. Peal
back the paper carefully so as not to smear the ink, set it aside and let the
ink dry completely before continuing.
Step 3: While
the ink is drying clean the rubber pad with soap and water or with the same product
you use to clean your rubber stamps.
Step 4: When
the ink is dry, turn the paper around so that the stamped lighthouse is upside
down and using a position tool direct stamp the lighthouse in black ink slightly
overlapping the bottom edges and again set aside and let the ink dry.
Step 5:
When the ink has dried, color the design.
To finish the
lighthouse card, I trimmed the stamped panel so that the water line is centered
on the card; I then edged the stamped panel with light blue ink and mounted the
finished panel on a dark blue paper; which I trimmed 1/8” larger than the
stamped panel and mounted them on a white card.
The text I used is a sticker, but obviously a stamped text can be used
as well.
Deer at Rest Card (double mirrored
image)
Step 1: Lay
the rubber pad down flat on your work surface and stamp the deer (Stampin’ Up!)
with brown ink on the rubber pad aligning the bottom of the stamp with the
bottom of the rubber pad.
Step 2:
Lay the background paper over the stamped deer face down (making sure that
there is enough room for the rest of the stamping) and rub the back of the
paper to transfer the inked lighthouse.
Peal back the paper carefully so as not to smear the ink, set it aside
and let the ink dry completely before continuing.
Step 3:
While the ink is drying clean the rubber pad with soap and water or with the
same product you use to clean your rubber stamps.
Step 4: Lay
the background paper face up on your work surface (the deer should be upside
down) and lightly draw a pencil line extending to the left from the bottom of
the deer image (which is now the top).
Make a small pencil mark above the pencil line marking where the deer
image ends on the left side.
Step 5: Place
the tree image (Stampin’ Up!) stamp face up on your work surface and align one
edge of the rubber pad along the stamp’s edge and mark the length of the image
with two pencil marks. Transfer/extend
the marks so that they are visible on the back side of the rubber pad.
Step 6: Lay
the rubber pad down flat on your work surface with the marked edge on the
bottom and stamp the tree image in brown ink between the pencil marks along the
edge of the rubber pad.
Step 7: Carefully
rotate the rubber pad and align the edge of the stamped portion of the rubber
mat to the underside of the line you drew and aligning the right pencil mark on
the back of the rubber pad to the left one at the end of the deer, lay down the
rubber pad and rub the back to transfer the image to the paper. If everything worked out you should have a
continuous image.
Step 8:
When the ink is dry, turn the paper around so that the stamped deer and tree is
upside down and using a position tool direct stamp the deer and tree in brown
ink slightly overlapping the bottom edges and again set aside and let the ink
dry.
Step 9:
When the ink has dried, color the design.
To finish the
deer card, I trimmed the stamped panel so that the water line is centered on
the card; I then edged the stamped panel with brown ink and mounted the panel
on a white card.


